
در اندروید به Message هایی که در بالا و در drawer area خارج محیط برنامه قرار دارد Notification میگویند.
آشنایی با کلاس NotificationChannel
در android api بالای ۲۵ ما موظف هستیم به هر یک از Notification ها یک NotificationChannel اختصاص دهیم. در حقیقت هر برنامه میتواند چندین NotificationChannel داشته باشد. پس هر نوتیفیکیشن داخل یک NotificationChannel است. به عنوان مثال یک پیام رسان برای تک تک افراد که با آنها ارتباط داریم و مکالمه داریم یک NotificationChannel ساخته و تمام پیام های مربوط به یک فرد در آن قرار میگیرد. حال برای ساختن یک NotificationChannel به شکل زیر عمل میکنیم.
private void createNotificationChannel() {
    // Create the NotificationChannel, but only on API 26+ because
    // the NotificationChannel class is new and not in the support library
    if (Build.VERSION.SDK_INT >= Build.VERSION_CODES.O) {
        CharSequence name = getString(R.string.channel_name);
        String description = getString(R.string.channel_description);
        int importance = NotificationManager.IMPORTANCE_DEFAULT;
        NotificationChannel channel = new NotificationChannel(CHANNEL_ID, name, importance);
        channel.setDescription(description);
        // Register the channel with the system; you can't change the importance
        // or other notification behaviors after this
        NotificationManager notificationManager = getSystemService(NotificationManager.class);
        notificationManager.createNotificationChannel(channel);
    }
}
هر NotificationChannel یک id دارد که یکتا است و نام و اولویت نیز که ثابت آن در کلاس NotificationManager وجود دارد. بوسیله createNotification رجیستر میشود.
نمایش Notification
برای نمایش دادن یک نوتیفیکیشن از Notification.Builder استفاده میشود که یک کلاس Builder است و ما ویژگی های نوتیفیکیشن را set کرده و در نهایت آن را build میکنیم تا آبجکت notification را ساخته و به ما بدهد. در نهایت آن را به وسیله متد NotificationManager به نام notify آن را نمایش خواهیم داد به مثال زیر دقت نمایید.
NotificationCompat.Builder builder = new NotificationCompat.Builder(this, CHANNEL_ID)
        .setSmallIcon(R.drawable.notification_icon)
        .setContentTitle(textTitle)
        .setContentText(textContent)
        .setPriority(NotificationCompat.PRIORITY_DEFAULT);

NotificationManagerCompat notificationManager = NotificationManagerCompat.from(this);

// notificationId is a unique int for each notification that you must define
notificationManager.notify(notificationId, builder.build());
در کلاس builder ویژگیهایی را میتوان set کرد. آیکن، عنوان، اولویت، استایل، نوشتهی درون آن و … که مهمترین های آنها در پایین لیست شده اند. البته قطعا بهتر است به کل آنها در داکیومنتهای خود اندروید نگاهی بندازید.
setAutoCancel(boolean) - whether to hide when clicked
setColor(argb) - background color
setContentIntent(Intent) - intent for action to run when clicked
setContentText("s") - detailed description
setContentTitle("s") - large heading text
setGroup("s") - group similar notifications together
setLargeIcon(Bitmap) - image for big icon
setLights(argb, onMS, offMS) - blinking lights
setNumber(n) - a large number at right of notification
setSmallIcon(id) - image file for icon
setSound(Uri) - a sound to play
setTicker("s") - text to scroll across top bar
setVisibility(vis) - whether notification should show
setWhen(ms) - timestamp of notificationعملیات (Action) نوتیفیکیشن
یکی از مواردی که میتوانیم به Notification ساده اضافه کرده تا پویا تر شود action ها هستند. به مثال زیر نگاه کنید.

Intent snoozeIntent = new Intent(this, MyBroadcastReceiver.class);
snoozeIntent.setAction(ACTION_SNOOZE);
snoozeIntent.putExtra(EXTRA_NOTIFICATION_ID, 0);
PendingIntent snoozePendingIntent =
        PendingIntent.getBroadcast(this, 0, snoozeIntent, 0);

NotificationCompat.Builder builder = new NotificationCompat.Builder(this, CHANNEL_ID)
        .setSmallIcon(R.drawable.notification_icon)
        .setContentTitle("My notification")
        .setContentText("Hello World!")
        .setPriority(NotificationCompat.PRIORITY_DEFAULT)
        .setContentIntent(pendingIntent)
        .addAction(R.drawable.ic_snooze, getString(R.string.snooze),
                snoozePendingIntent);
در مثال بالا یک intent ساخته شده و action ها و extra هایی برای آن set شده است. برای آن که بتوانیم از آن استفاده کنیم باید یک PendingIntent از روی آن ساخته شود. در نهایت به راحتی با متد addAction یک دکمه با آیکن، عنوان و PI که در ورودی مشخص شده برای Notification شما ایجاد خواهد شد. با زدن روی دکمه intent لانچ خواهد شد.
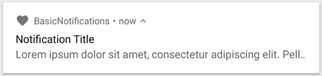
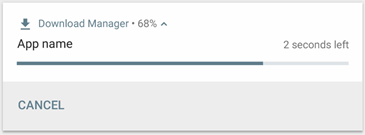
انواع Notifications Styles
Style های مختلفی برای نوتیفیکیشن ها موجود است. که توضیح همه آن ها میسر نیست. برای مثال برای نوتیفیکشینهایی که ProgressBar دارند یا برای کنترل مدیا استفاده میشوند یا یک سری نوتیفیکیشنهایی که غالب در پیامرسان ها مطرح هستند که میتوانید در جا ببیند و جواب دهید. در زیر چند نمونه نوتیفیکیشن را مشاهده میکنید:

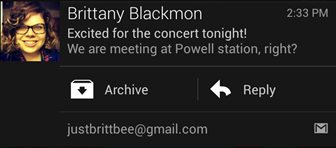
در زیر یک نمونه کد اندروید مرتبط با استایل نوتیفیکیشن را مشاهده میکنید:
Notification notification = new Notification.Builder()
     .setContentTitle("2 new messages with " + sender.toString())
     .setContentText(subject)
     .setSmallIcon(R.drawable.new_message)
     .setLargeIcon(aBitmap)
     .setStyle(new Notification.MessagingStyle(resources.getString(R.string.reply_name))
         .addMessage(messages[0].getText(), messages[0].getTime(), messages[0].getSender())
         .addMessage(messages[1].getText(), messages[1].getTime(), messages[1].getSender()))
     .build();